
The Field Service (Dynamics 365) mobile app helps your frontline workers manage and complete their service tasks while onsite at a job. The mobile app enables them to view their daily schedule, complete inspections, bill for products and services, send reports to customers, and submit their time-off requests.
The Field Service (Dynamics 365) mobile app is built on Microsoft Power Platform. As you transition your organization to the Field Service (Dynamics 365) mobile app, follow these best practices and tips for setup and deployment.
Tip 1:Assign the Field Service-Resource security role or equivalent permissions
To make sure that frontline workers have access to the right tables (entities) and columns (fields) on the mobile app, you might need to edit the security role assigned to them.
Assign each frontline worker, or resource, the Field Service-Resource security role and field security profile because many processes check for users with that security role. For more information, check out the frontline worker setup instructions.
For example, the Booking and Work Order form is visible to users with the Field Service-Resource security role by default, but users with other security roles need to be given access explicitly.
Augmenting the Field Service-Resource role
If you want to augment the security privileges of the Field Service-Resource security role, you need to create a new role with the permissions you want to add, and then assign the new security role to users in addition to the Field Service-Resource security role. The same principle applies for field security profiles.
Removing privileges from the Field Service-Resource role
If you intend to remove or lower security privileges, then we recommend that you copy the Field Service-Resource security role, make your changes to the copy, and then assign the copied security role to the frontline worker users. Then, give your newly created copy of the security role access to the Booking and Work Order form included with Dynamics 365 Field Service. This form is used to view scheduled jobs (see the next tip).
Read about Field Service security roles for more information and steps to copy security roles.
Performance considerations
Using the mobile application with a role that has broad access to data, like an admin role, might result in larger data downloads and longer sync times of offline data. Test your application with the security role applicable to end users. For more information about security roles, check out Install and set up the Field Service (Dynamics 365) mobile app.
Tip 2:Use forms and controls included with the Field Service (Dynamics 365) mobile app
It’s important to use the forms that come with Field Service rather than creating new ones, because the default forms and controls are optimized for performance and usability on mobile devices.
For example, use the Booking and Work Order form to show frontline workers their schedules and job information. The Booking and Work Order form has custom code that is purpose-built for field service scenarios. Add your organization’s schedule and job information into the form.
The same is true for controls. Use the controls that are included with Field Service where possible. Examples include the booking map for job locations and the calendar control for schedules.
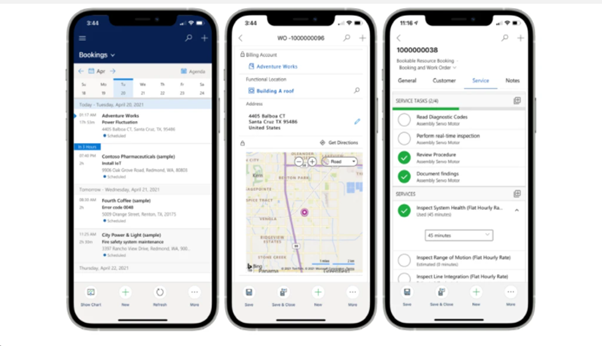
Here is an example of some of the mobile optimized forms and controls included with the Field Service (Dynamics 365) mobile app, such as at-a-glance agenda view, customer information with address and maps, and an intuitive experience to track the services performed and parts consumed:
Performance considerations
Surface the most relevant fields and information to technicians up front. Overloading the form with less-used fields and controls will impact app performance, so consider creating new sections or tabs to host custom content. Take feedback from users to determine what content is necessary and what can be removed or hidden from forms.
For more information, go to Edit the sitemap (home screen), forms, and views.
Tip 3:Follow best practices when using offline profiles
Offline profiles control which data is downloaded to the device. We strongly recommend that you use the offline feature, even if your frontline workers always have internet access.
Using downloaded data is much faster than using data on the server that is accessed over the internet, thus improving overall performance. Set up an offline profile, and then add users and teams to the offline profile.
Here are a few more pro tips for using offline profiles:
- Use the offline profile included with Field Service – The Field Service Mobile Offline Profile provides an ideal starting point for offline configuration, with defaults for out-of-the-box entities and sync intervals. Use this profile and build upon it by including your custom entities. By working within the provided profile, default entities can still receive updates over time.
- Avoid removing default entities from the offline profile – These default entities are purposefully added to ensure the right data is available to the frontline worker. Focus on adding the entities you need to the offline profile rather than removing ones you do not need.
- Avoid using “All records” as an offline filter – The offline profile is the gate that controls the amount of data downloaded to the frontline workers’ devices. To keep sync times fast and efficient, avoid including “All records” as an entity filter and avoid wide date ranges. As an example, rather than downloading all customer asset records, download only the records related to scheduled work orders. This will reduce the number of customer asset records without impacting work that needs to be done.
- Use offline JavaScript – Organizations often need to run workflows on mobile devices to execute business processes. However, Power Automate flows only run when the device is connected to the internet or on the next sync. Use offline JavaScript to run workflows on the device quickly and without internet access. For more information, go to Workflows and scripts for the Field Service (Dynamics 365) mobile app.
- Understand how the app works offline. Lastly, it is important to know that once you set up an offline profile, the mobile app prioritizes offline operations. This means the app will use downloaded data when there is no internet access, and even when there is internet access. The only difference is that, when there is internet access, data will be synced back to the server every few minutes or when the frontline worker manually syncs the app. When there is no Internet access, the sync runs later, when a connection is restored.
Performance considerations
By using offline profiles, data will be downloaded to the device. With offline data, in-app performance such as displaying forms will be much better. Limiting the amount of data in the offline profile to what is needed by the user will improve sync performance.
For more information, go to Configure offline data and sync filters for the Field Service (Dynamics 365) mobile app.
Tip 4:Use up-to-date devices that meet recommended requirements
Many organizations follow a “bring your own device” (BYOD) policy where frontline workers use their personal phones or other devices for business. The Field Service (Dynamics 365) mobile app works on many devices running iOS or Android software, and support for Windows 10 devices is planned.
For the best performance, make sure your team has newer devices that run the latest operating system versions. Review the supported mobile platforms for recommendations about operating system versions, RAM, and storage.
Tip 5:Take advantage of Microsoft Power Platform
The Field Service (Dynamics 365) mobile app is built on Microsoft Power Platform, so the mobile app can take advantage of several capabilities of Microsoft Power Platform.
Here are just two common examples:
- Use Power Automate to send push notifications to frontline worker devices based on predefined triggers and events. For more information, go to Enable push notifications.
- Use Power Apps component framework to create new controls for the Field Service mobile app. For more information, go to Power Apps component framework overview.
Planning for your deployment
In addition to these Field Service best practices, here are a few more planning tips that can be helpful for your project:
- Do user acceptance training. Ensure buy-in across your organization by bringing the people who will be using the application into the release process early. Select a diverse set of users across geographies or business units. Set up feedback channels to understand pain points and address problems before going live.
- Do a phased roll out. Reduce risk by segmenting your release over phases; commonly this is done by geography, or by business group. Take feedback from users and expand the deployment once stable.
- Pilot the mobile apps side-by-side. If you are a current customer of Field Service, you can pilot the new Field Service (Dynamics 365) mobile app alongside the Field Service Mobile (Xamarin) app, as well as other Field Service apps your organization might be using. This will help you assess how your frontline workers are currently using the apps: what data is most important and what information is most commonly viewed and edited. In this way, you will better understand what functionality to include in the new Field Service (Dynamics 365) mobile app.
- Measure performance. How the mobile app performs is a big factor in how much frontline workers enjoy using the app. Add performance measures to the deployment plan and test how editing forms, the mobile offline profile, and workflows affect app performance. Take feedback from users to determine what is necessary and what can be removed or hidden from forms.