
Bring customer and sales data quickly into your app by importing it. The Sales Professional app can be used for importing data into most record types.
Dynamics 365 Sales Professional processes import in the background. After an import completes, you can review which records succeeded, failed to import, or were partially imported. To fix the records that failed to import, export them into a separate file, fix them, and then try to import them again. You can delete all records associated with an import.
Supported file types
You can import data from the following file types:
- Comma-separated value (CSV) files.
- Microsoft Excel templates available in Dynamics 365 Sales. More information: Export data or template.
Prepare your file for import
Follow these guidelines to make sure that your file imports successfully:
- Put records for each record type in a separate file.
- Make sure that the file is in one of the following formats:
- Comma-separated value (CSV) file, a data file with a .csv file extension. Typically, a CSV file consists of fields and records, stored as text, in which the fields are separated from one another by commas.
- Excel template.
- If your import file is a CSV file, make sure that it is correctly delimited. You can use double quotation marks (“) or single quotation marks (‘) as data delimiters.
- Make sure that the first line of a file contains the column headings.
- Edit your file and add column headings (text used in the first row of a spreadsheet or file that labels the data in each column) if they are not already present.
Note:
Make sure that the CSV file does not contain:
- Multiple lines in the first line (header row).
- Quotation marks in the first line. In Dynamics 365 Sales Professional, quotation marks are used as data delimiters.
- Data separated with a semicolon (;) or comma (,). In Dynamics 365 Sales Professional, semicolons and commas are used as field delimiters.
Important:
To import files quickly, it helps to have your column headings match the display name of the fields in Dynamics 365 Sales Professional. This will help in the automatic mapping of data while you import. (The display name is a label that is used by default when an attribute is displayed on a form, in a list, or in a report. The Display Name field for each attribute can be changed in the Customization area by a user with an appropriate security role.)
- Make sure data exists for all business-required fields.
A record will import only if all Dynamics 365 Sales Professional business-required fields are mapped and if the data exists in each of the source columns that are mapped to the required fields. (Business-required fields are attributes that are required before a record can be saved. Required fields are marked with an asterisk.) You can either determine the required fields in advance or identify missing required mappings during the import. In either case, make sure you include the required data in each record.
To determine which fields are business-required, open the form for the record type as if you were creating a new record, and identify fields that are marked with a red asterisk (*).
The following list shows default business-required fields for commonly imported record types:
- Account: Account Name
- Contact: Last Name
- Lead: Topic, Last Name, Company Name
- Product: Default Unit, Unit Group, Decimals Supported
Example showing sample leads to import:
The following example shows what the data might look like for a CSV file containing leads to import. The first line contains the field names, and the remaining lines are imported as data.
`Company,Last Name,First Name,Topic,Email,Mobile Phone`
`“Coho Winery”“Glynn”“Jim”“New store opened”“someone@example.com”“555-555-0112”`
`“Adventure Works”“Anderson”“Nancy”“Components”“555-555-0171”`
Note
By default, the maximum size of the files that you can import is 8 MB.
Import records from an Excel template
- In the site map, select Sales Settings. Under Standard settings, select Import data.
- On the Import Data page, in the Data Type drop-down list, select the record type you want to import the data for. In the File Type drop-down list, select Excel, and then select Start Import.
- Select Browse to upload a file.
- Select Next.
- All the fields in your source file are automatically mapped. Select Finish Import.
Import records from a CSV file
- In the site map, select Sales Settings, and under Standard settings, select Import data.
- On the Import Data page, in the Data Type drop-down list, select the record type you want to import the data for. In the File Type drop-down list, select CSV, and then select Start Import.
- To make sure that the import is successful, follow the steps in “Prepare your file for import”.
- Select a file to upload. Only a comma-separated value file and an Excel template file is supported.
- Select Next.
- If you have an alternate key defined, select it from the Alternate Key drop-down list.
The alternate key is used to uniquely identify and update records during import instead of using the primary key. Some external data systems do not store primary keys. In such cases, an alternate key can be used to uniquely identify records.
- In the Data Delimiter drop-down list, select the data delimiter that you’ve used in your CSV file.
- Select Review Mapping.
- In the Review Mapping page, review how your column headings are mapped to the fields in Dynamics 365 Sales Professional.
By default, the Primary Fields section of the wizard shows all the required fields for the entity that must be mapped for the data to import successfully on the left side.
Note
If you’ve selected an alternate key, all the fields of the alternate key also become required fields and must be mapped.
If the column headings of your source file match the field display names, these fields will be automatically mapped. All the mapped fields will be shown with a green check mark.
- If the column headings don’t match, the unmapped fields will be shown with a red exclamation point. Select a Dynamics 365 field to map to the unmapped column heading of your file.
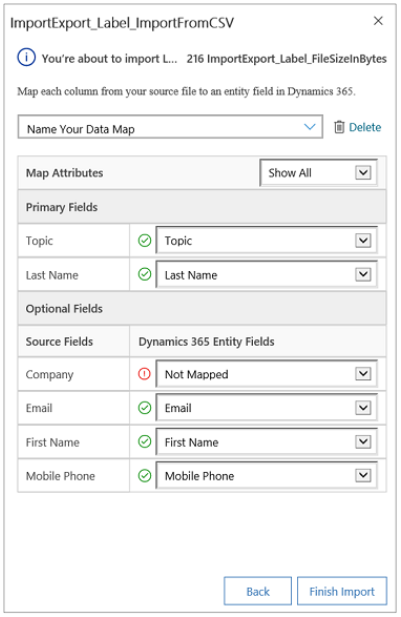
In the Optional Fields section, the left side shows the column headings in your source file. If the column headings match the field display names, the fields will be automatically selected in the corresponding drop-down lists.
If the column headings don’t match, the unmapped fields will be shown with a red exclamation mark.
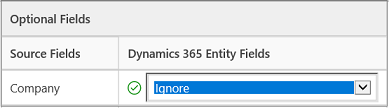
- Select a Dynamics 365 Sales Professional field to map to the unmapped column heading of your file. You can also select Ignore from the drop-down list. If you select Ignore for a column, the data in that column won’t be imported into Dynamics 365 Sales Professional.
- While importing your data, if any column in your source file includes a fixed set of values, you must map the column to a field of Option Set type. A column of this type has values such as “Yes” or “No,” or “Hot,” “Warm,” or “Cold.” To do this, select the icon next to the option set field. The Option set mapping section opens:
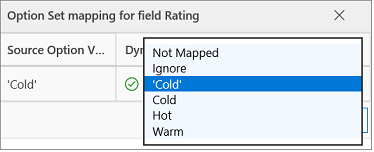
For each Source Option Values item, select an item from the Dynamics 365 Option Values list to map it, and then select OK.
When you are mapping the source values to items in the Dynamics 365 Option Values list, the Import Data wizard temporarily adds the items from the source values to the Dynamics 365 Option Values list. You can map the source list values to the existing options in Dynamics 365 or to the added values. If you map to one of the added values, these new values are created in Dynamics 365 Sales Professional.
For example, your source values and the Dynamics 365 target values could have the following values before the import starts:
| Source values | Dynamics 365 Sales Professional target values |
| Low | Cold |
| High | Warm |
| Hot |
During the import, the Import Data Wizard adds the source values to the Dynamics 365 target values:
You can map “Low” in the source values to “Cold” in the Dynamics 365 target values. Also, you can map “High” in the source values to “High” in the Dynamics 365 target values.
| Source values | Dynamics 365 Sales Professional target values |
| Low | Cold |
| High | Warm |
| Hot | |
| Low | |
| High |
Based on these mappings, the Import Data wizard creates “High” as a Dynamics 365 target value. It does not create “Low” as a Dynamics 365 target value because you did not map any source value to the added Dynamics 365 target value of “Low”.
Note
You can also map a column in your source file to a field of type Two Options and Multiselect Option Set (where a field can have multiple values). You must map each Source Option Values to the items in the Dynamics 365 Option Values list. When mapping to a field of type Multiselect Option Set, if your source file includes values that aren’t available in Dynamics 365 Sales Professional, new values won’t be created.
- If some data in your source file references other existing records in Dynamics 365 Sales Professional, you must map the column in the source file to a lookup field of Dynamics 365 Sales Professional.
For example, say you want to import the file Leads.csv that contains customer records. The Customer column in the Leads.csv contains the associated account or contact data.
To do this, select the search icon next to the lookup field. The Lookup Reference section opens and lists the related entities to the current entity. For each entity, select the fields to search during import to retain the relationships between the records, and then select OK.
- To save these mappings as a data map, enter a name in the Name your data map box.

You can just select this data map when you want to import similar data in the future. The data map maps data based on the mappings you’ve defined earlier.
- Select Finish Import when you have mapped each column from the source file to a Dynamics 365 Sales Professional field or have selected Ignore in the list under Dynamics 365 Entity Fields.
View the results of an import, and correct errors
You must wait for an import job to complete before you can repair failures.
- In the site map, select Sales Settings, and under Standard settings, select Import data.
On the Import Data page, the Import log section shows the jobs for all the imports.
- Monitor the progress of the import.
The Status column shows the status of the import. The status progresses through these values:
- Submitted
- Parsing
- Transforming
- Importing
- Completed
- After the import is complete, the Success, Errors, and Partial Failures columns show the number of records that were successfully imported, failed to import, or were partially imported.
- Open the import file to view the records that did not import or were partially imported. Open the import file record.
Select appropriate tabs to see information about failures, success, or partial failure of records during import.
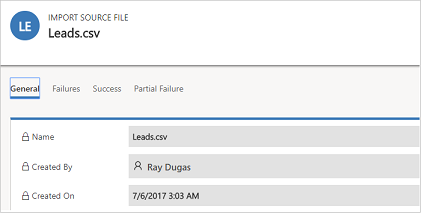
- On the Failures tab, export rows that failed to import to a new CSV file. Select Export Error Rows. You can correct the errors in this file, and then import it.
Delete imported records
- In the site map, select Sales Settings, and under Standard settings, select Import data.
Import jobs for all the imports appear in the Import log section.
- Select the import file that you want to delete, followed by one of the following actions:
- Delete import source file. This deletes the import log file and its details.
- Delete imported records. This deletes all records that were imported from the selected file.
- Delete All. This deletes the import file along with the records that were imported from the import file.
Import data from Exchange in Dynamics 365 Sales Professional
If you’ve been keeping track of all your contacts in Microsoft Exchange, you can quickly get all your contacts in Dynamics 365 Sales Professional so you have all your data in one place.
Prerequisites
To be able to import from Exchange:
- You must have a valid Exchange subscription and license.
- Your mailbox must be tested and enabled. Talk to your administrator if you receive an error.
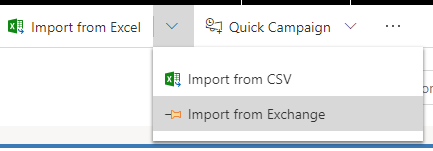
- If you’re a user with a Sales Professional or Sales Professional Manager role, go to the list of contacts. On the command bar, select Import from Excel > Import from Exchange.
-OR-
- If you’re a user with a System Administrator role, in the site map, select Sales Settings. Under Standard settings, select Import data.
- In the Data type drop-down list, select the type of records you want to import. In the File type drop-down list, select Exchange, and then select Start Import.
The Track data from Exchange dialog box opens.
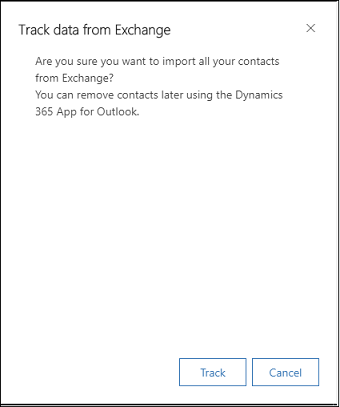
- Select Track
All the contacts from Exchange will start importing to Dynamics 365 Sales Professional. Any changes that you make to contacts in your Exchange mailbox are automatically updated in the contact records in Dynamics 365 Sales Professional.